How to Clean a Gas Grill Video Tutorial

Hey Y’all, Grill Girl Here. I’m right in the middle of fixing up this Barbecues Galore Turbo grill that’s about 15 or 20 years old and I wanted to give you a note about how to clean a gas grill.

Now, everyone has their own ideas *and of course you’re entitled to yours* but this is how I feel about gas grills; you should be able to leave them outside. They are outdoor cooking appliances and you shouldn’t have to thoroughly clean them every single time you use them.

When to Clean a Gas Grill

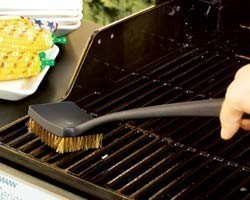
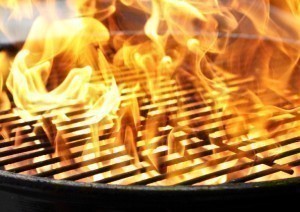
Think about your oven. Most people don’t scrub out their oven every single time they use it. Preheat your grill (get it really hot) each time you cook, before you put the food on it. This will sanitize the cooking space. It’s good to use a grid brush to remove food particles and debris from your cooking grid. However, you don’t have to constantly clean everything else to keep your grill in shape. In fact, grease drippings on the heat dispersal (the level that goes right above the burner) give you a better flavor.

That being said, once or twice a year, go through and clean all parts of your grill.

We recommend cleaning your grill at the end of your busiest grilling season, sometime in the fall, before you put it away for the winter. Remove the food and grease debris from your grill and avoid it being a magnet for rodents or insects. Also, it helps keep your grill parts in better shape while not in use.

It’s a good idea to clean it again when you take it back out in the spring. Sometimes spiders can build webs that impact the gas flow in burners and valves. Turn on each burner to make sure they light up all the way. Take this opportunity to check to see if there are any parts you need to replace.

If you cook all throughout the year, choose two times each year to clean your grill. We still think Fall and Spring work!

How to Clean a Gas Grill

You don’t want to get too much debris stuck down into the bottom of the grill body. It can be a cooking hazard and give you some burned flavor. For the twice-yearly cleaning, make sure your grill is completely cool. Remove the cooking grids and heat dispersal system (heat plates, briquettes, etc). Get on your gloves if you don’t want to your hands to get dirty. Use a firm-bristle plastic brush (as shown in the video) to brush out the debris in the body of the grill. Use a shop-vac or small dustpan to remove it.

It’s amazing how much nicer your grill looks after that simple task.

While your cooking grids are out you can scrub them more thoroughly than your everyday cleaning. If you have a porcelain-coated grid, you’ll want to be careful not to chip it off. Use a brass-bristled brush or a sturdy non-scratch scrub pad for the job.

Use the plastic brush you used in your grill on your heat dispersal to clean it off a little bit. Remember that heat dispersal gives your grill a smokey flavor so don’t spend too much time on it.

If you have a cast burner (iron, stainless steel or brass), clean out the holes of the burner with a toothpick or straightened-out paper clip. Remove the burner to do this well. If you’re having trouble lifting it up and out of the grill, it’s probably anchored in by a hitch pin at the back of the grill.

Put the parts all back in and your grill should be good to cook again.

Sometimes my customers tell me that they spend 20 or 30 minutes after every time they cook to clean their grill. To me, it’s just not the point of a gas grill. You know? It’s going to get a little dirty and that’s ok.

Alright y’all, Until next time! -Grill Girl

How To Clean and Maintain a Gas Grill – Weekly

What are the most important things to do on a weekly basis to clean and maintain a gas grill keep it in good shape?

Rusting is the most common way, especially in grills, that metal deteriorates. You can’t avoid it. The reason is because when you add moisture, high levels of heat, and metal, you’re going to get deterioration – usually in the form of rust. And what does grilling always entail? – Metal, moisture and heat.

In addition to that, there are many different qualities of material available in grills on the market today. If you’d like to know the difference in a $300 grill you can buy on sale at a big box store and a $1200 grill you can buy in a grill specialty store, it’s how it’s made and with what material. Something like cast aluminum doesn’t rust. The only deterioration you’ll see with aluminum is oxidation which occurs over decades instead of months, like rust. It’s more expensive than the stainless steel sheet metal that’s bent into a grill shape. Even among stainless grills, not all stainless steel is created equal. You can read more about the deal with stainless steel in this post.

No matter the material or quality of your grill, there are steps you can take to clean and maintain a gas grill to minimize rust, clean away rust, and help your grill, and grill parts, work for you as long as possible.

  1. Use a BRASS-bristled brush to clean your cooking grid surfaces after you cook your food – while your grill is still warm.
    -Brass is important because it is softer than the coatings on your grid surface. Even if your grid says it’s stainless steel, that could just be a coating! The only time I suggest using a steel bristled brush is when you’re cleaning the inside molding or casting of your grill.
    -Always check for pieces of the brush that might have broken off your brush while you were cleaning. You don’t want to eat that!
  2. Moisture is NOT your friend!
    -Use a cover to protect your grill from rain. If you have an especially fragile (read here cheap) grill, moving it under an awning while it’s not in use is not  a bad idea.
    -I’m a big believer in quality so I don’t like the idea of a grill you have to give so much special attention to – but that’s the reality with most grills under the $300 price point if you want them to last more than 2-3 years.
  3. Notice some rust? Don’t panic!
    -Use your grid brush to remove most of the rust and then rub oil into the area that was rusting. This will seal out the moisture and delay further rusting.
    -It’s a good idea to do this whenever you notice rust in your grill, but also reapply oil before you preheat for cooking.
  4. Preheat before cooking.
    -Preheating your grill not only gets it to the right temperature for cooking your food, it also sanitizes your cooking area! Use your grill’s highest setting for about 15 minutes to preheat and then adjust the temperature when you’re ready to cook.

grill, grilling, clean, brush, brass

Make sure the brush you use has brass bristles and check that no broken off pieces of the brush are left on your cooking surface when you’re ready to grill!

You should get into the habit of taking these steps every time you grill, or at least once a week if you grill often.

There are also some more in depth steps to take when you put your grill away for the season and again when you take it out for the first time each season. Thankfully, here in Georgia, we’re still months away from the end of grilling season!

-GG

What is a Flashback?

A flashback is a literary term used to describe a vision of something that has previously occurred.

Or is it?

Yes, it actually is. However, in the grilling industry it’s something that can be scary and even dangerous. Grilling Fire Flashback

A flashback is what happens when you turn on your grill and light it and a ball of flame comes up toward the front of the grill.

Thankfully, flashbacks are easy to fix and avoid completely. They are caused from a build up of grease, debris or even spider webs! What happens is the blocked gas builds up in one place and when you light the grill, all that accumulated gas lights at once.

To avoid them, clean your grill once or twice each year. Check around the gas valve – especially the orifice – for any kind of build up. Look for grease and char from grilling.

Keeping the inside of your grill clean will not only avoid flashbacks, it will also help your grill last longer AND make your food taste better. Happy late summer grilling!

-GG