The Gas Grill Burner

The Gas Grill Burner – What it it and how to find a replacement.

Once I had this conversation with a customer:

Customer: “Hi I need something but I don’t know what it’s called. It’s a long tube where the fire come out?”
Me: “Oh, yes! The burner?”
Customer: “Um, hmm, no. It’s not the burner. It’s this long tube with holes in it and it’s where the fires comes out to cook the food…Well maybe that’s the burner, I don’t know.”

Let me assure you all.

Yes.

That is the burner.

So what is a gas grill burner?

Our customer described it pretty well. Not all burners are tubes, but all gas grill burner have holes where fire comes out to cook your food. There are many different styles of burners. Grill manufacturers often use this part of the grill to differentiate themselves from other grills. Some of the most common styles of burner are H, oval, tube, rail.

Gas grill burners can be made out of stainless steel, steel, cast iron, brass and even have ceramic elements.

If you don’t have a model number for your grill (see previous post), you can use your original burner to find the correct replacement. You will, however, need to take the burner out of your grill to get the best measurement. You’ll need to be able to describe what the shape of your burner is and the dimensions of it.

Gas grill burner styles include H, oval, rail, and tube

So, just remember, it’s the thing in your grill where the fire comes out. THAT’S the gas grill burner.

Happy grilling!!

-GG

What Do I Need to Know About Gas Grill Regulators?

What are gas grill regulators and do you need to replace yours?

The term “regulator” is usually used in the grill world to describe the gas grill regulators, hoses and fittings that bring gas from your LP tank and connects it to your grill.

Standard Single-Hosed Gas Grill Regulators

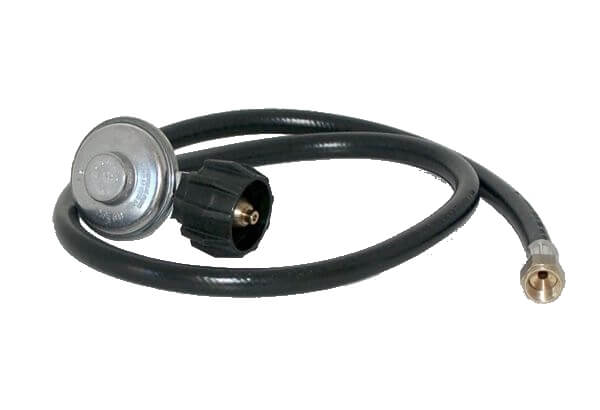
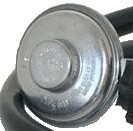
Technically, the regulator is the silver colored disc part that looks like this:
Gas Grill Regulators

The hose connects it to the brass fitting which is the part that screws onto your grill. Right next to the regulator is a collar that twists freely. That’s the part that screws onto the LP tank. Though you should always turn off your LP tank when you’re done cooking or when you’re changing the regulator, LP tanks are made with an automatic shut off valve. It will only work when a regulator hose is connected to it.

How do you know when it’s time to replace your regulator?

As I mentioned, the regulator brings gas to your grill burners. Here are some indicators you need a new gas grill regulator

  • Low heat coming from your burners when your gas is turned on high. Do a visual check on your burners to make sure they are all in one piece and there are no obvious holes or problems.
  • Your burners light up unevenly. For example, if the burner on the far right flickers or hardly lights, the middle burner has low flame, and the left burner has a normal looking flame.
  • Over time your grill gets less and less hot. Last week it took 10 minutes to grill some burgers, but today it took 15 to grill the same burgers.

WHY? Regulators, for safety reasons, close down slowly over time as they “go bad.” You probably won’t notice one day your grill is perfect and the next it doesn’t light at all. The burner closest to the source of gas will light up better than those farther down the manifold. Your grill will get to lower and lower temperatures over time, even on “high” heat. The main indicator of needing a new regulator is low heat or low flames, especially if it’s getting worse over time.

What else could go wrong?

Keep in mind that you may also have a problem running along the hose. Be aware of the smell of gas even when your grill is off or a tiny hissing sound.

Some animals like to chew on the sun-baked rubber hoses. (Don’t knock it ’til you try it?) If this is a problem for you, they have invented handy-dandy hose guards. Check them out.

If you think there’s a leak, but you’re not sure, you can check the hose with some very soapy water. Rub the suds all the way along the line of the hose. Turn on the gas tank. If there is gas escaping, it will cause the soapy water to bubble at the point of the leak.

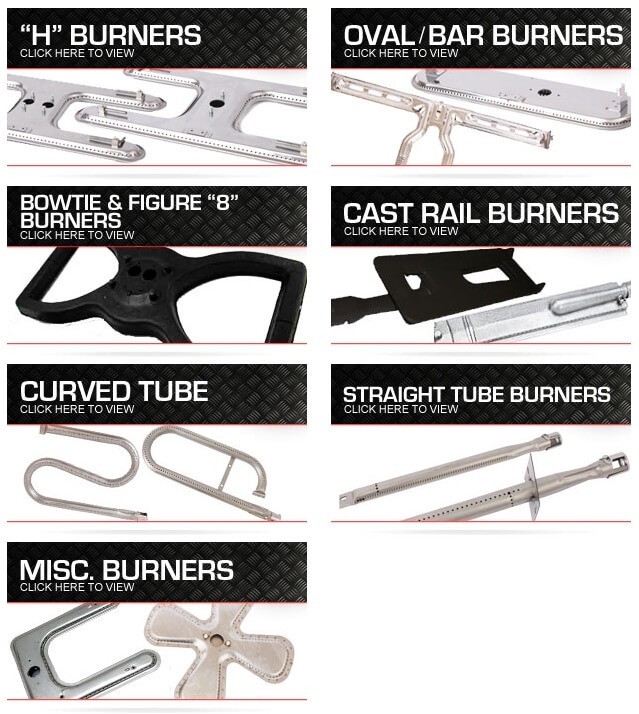
What are the differences in gas grill regulators?

A single-hosed, standard regulator is the most commonly used part on grills. It’s the picture I used above. These regulators let out up to 60,000 BTUs of gas.

If you have a side burner, check out this dual-hosed standard regulator. There is one regulator (remember that’s the disc) and there are two separate hoses. Sometimes one hose comes off the regulator and splits into two hoses, forming a Y shape, and sometimes there are two hoses coming directly out of the regulator itself. Either will work and they are interchangeable.

Updated June 2021: Many of our gas grill regulators now support high-flow needs (let out up to 90,000 BTUs of gas). These are compatible with grills that originally used a standard flow. However, please note that your high setting might give you more heat than before. Pay attention the first time you grill with a new regulator and take note of the cook temps!

How do you know?

Usually, the removal and visual inspection of your regulator determines which replacement you need. It’s also a good idea to measure the existing hose and/or the space a hose needs to stretch to reach from the tank to the valve or manifold. If you’re not sure, call 678-272-2451. The staff at GrillPartsSearch.com is always happy to help.

Special Cases

Keep in mind, a standard regulator and hose will not work if you have:

  • Natural gas grill (NG)
  • A crimped hose onto the valve or manifold in your grill. You will know because you won’t be able to unscrew the hose from your grill. In this case, you need to contact your manufacturer to replace the entire valve system.
  • Male fitting on the end of the hose that connects to the grill.
  • Hose fitting larger or smaller than a 3/8″ flare, which translates to about a 5/8″ inner diameter measurement of the opening at the end of the fitting.

Here’s a picture of the fitting:

Gas Grill Regulators Female Flare Fitting
You can’t measure the 3/8.” It’s confusing, I know. Like I said, check for a 5/8″ measurement.

The good news is that this can be the easiest, cheapest part of your grill to fix!

Remember, not all regulators are created equal. Lower quality rubber will degrade and break more easily in the sun. A lower quality regulator can go bad more quickly.

(This theme came from our FAQs. Let me know if you have a question in our comments section and I can answer it there or even write a blog for you!!)

Spring is coming!!!
-GG

Visit GrillPartsSearch.com’s profile on Pinterest.

How Do I Replace My Gas Grill Rail Burner? – with video

Hey Y’all!! Grill Girl here! Today, we’re going to be changing the gas grill rail burners on a Brinkmann Pro Series 2400.

This blog on replacing gas grill rail burners updated June 2021. Call us for help with your grill 678-272-2451!

This how-to video will relate to any brand of grill that uses cast iron rail-type burners, like the one in this photo:

Grill with Rail-Style Burners

Gas Grill Rail Burner Replacement

  • The first step to replacing your old grill burners is to remove the cooking grids and heat plates covering your burners. Once you have done that, your grill should look similar to the one in the above photo.
  • Remove the hitch pin from the burner bracket to loosen the burner itself.
    **The hitch pin connects the burner to the burner bracket to holds it in place. It feeds through a little knot on the underside of the burner. The easiest way to remove it is by using needle nose pliers.
  • Now the burner is free at the back end, but still connected through the steel plates in the front of your grill.
    **In the case of rail-type burners, the burner is not attached to the valve, it simply fits over the valve. The valve system is right behind your knobs on the front of your grill, so if you want to make sure there’s nothing else connected to your burner, you can kneel down and look under the knobs and face plate of your grill. You’ll see the burner fit over the valve.
  • Once nothing is holding onto your burner, lift up the back end and pull!!!
    **It’s okay to use a little force. I had to!! This is a gas grill we’re talking about here, not a china cabinet.

**IF YOU DON’T KNOW WHICH GAS GRILL RAIL BURNER YOU NEED AS A REPLACEMENT, YOU CAN MEASURE IT – NOW THAT YOUR OLD BURNER IS REMOVED, YOU CAN MEASURE THE ENTIRE LENGTH AND WIDTH OF IT.**

  • With your brand new burner in hand, slide the venturi, or tube-looking, end back over the valve at the front side of your grill.
    **Make sure to guide the tube over the valve of your grill. You may have to kneel down again to make sure it fits over properly. This is how the gas gets into your burner.
  • Rest the back end of the burner on the bracket and put the nub into place.
    **There should be a little hole on the bracket where it fits in.
  • Place the new hitch pin into the nub under the bracket to hold the burner securely in place.

That’s all there is to it, folks!! Again, this tutorial will work for any rail-style burner, but for those of you who want specifics here they are, all linked up if you need parts:

Brinkmann models that use the rail style burner

The grill in the video: Brinkmann Pro Series 2400, model number 810-2400-0.
Other models that use three of the exact same burner are:810-2235-0,810-2200-0,810-2210-0,810-2210-1,810-2250-0,810-2250-1,810-2250-2,810-2300-0,810-2300-B,810-2310-0,810-2310-1,810-2320-B,810-2400-2,810-4345-0,810-6305-T,810-6355-T.
The parts used in this video were the burner CITL, and the burner bracket (no longer available), and were provided courtesy of GrillPartsSearch.com.

You can do it!!! -GG

Visit GrillPartsSearch.com’s profile on Facebook.

Refurbish Your Grill – Get Ready for Spring Grilling!

This Refurbish Your grill Article was updated june 2021

Hello Fellow Grillers!! It’s January and freezing temperatures even down south here in Georgia. Still, I can’t stop thinking about getting out the grill for the spring. (True true, we never really “put it away”). The very best time in the whole entire year to refurbish your grill is early spring. There are a few reasons for this.

Why Refurbish Your Grill in Early Spring?

  • Even though you haven’t used your grill much over the cold months, the moisture and cold temperatures have still affected your grill parts.
  • Most people only replace their grill parts when they try to use their grill and can’t for some reason. That creates a lot more volume in the spring and summer months for grill part companies. In other words, buy now and you’ll get more in depth service, better stocked parts inventory, and faster processing/shipping times.
  • Don’t put yourself in a situation where you have 1 or 2 days to get the replacement parts you need. If you run out of propane during a party, at least you can run to the nearest gas station and replace it. Not so with most grill part replacements.

And let’s be honest, it’s very satisfying to get into your grill, determine the problems, get the parts needed, and then refurbish your grill yourself. If it seems like a daunting task, I can promise you there’s no better ally than the customer service dept at GrillPartsSearch.com. I know because I worked with them for years. They want to help you keep your grill out of a landfill and get back to grilling again!!

(Here are some tips on finding your model number)

So what are you waiting for!? Go get rusty!!!

Then, get in touch!

Have fun you! -GG