What If The Grill Doesn’t Light?

What to do if your gas grill doesn’t light but it’s time to party!

Is your gas grill ignition button not working? Is the grill igniter clicking but not lighting? No worries and no need to cancel that party or BBQ dinner– you can safely light your grill even if the ignition system in your grill isn’t working!  Use a long-stemmed lighter to light each burner one by one. Just be sure to do it safely by following these steps.

If your ignition is not working, you can still light your gas grill using a lighter. A gas grill ignition malfunction is no reason why you shouldn’t be barbecuing burgers, hot dogs, shish kabobs, or whatever you and your family and friends enjoy today!

If you’re looking to repair or replace your gas grill ignition system, check out our vast list of ignitor parts or get in contact with one of our grill experts to help troubleshoot your problem!

What To Do If The Grill Doesn't Light

1. A Long Stemmed Lighter Is Safer to Light A Gas Grill

You don’t have to be a hero to be a hero. 

For safety’s sake use a long stemmed lighter for candles, fireplaces, and grills, like a BIC Multi-Purpose Classic Edition Candle Lighter with the long metal wand. That way you don’t have to put your hand and half your arm into the grill to light the flammable gas from your grill’s tank.

The great thing about this solution is how accessible it is. If you’ve got a suitable lighter on hand, then use that, but if not, you won’t have to wait around for a new grill part to get dinner ready. A quick run to the convenience store will save the day. 

2. Turn The Burners on One at A Time to Light Them

If the ignition for one burner isn’t working, in most cases grillers find that they aren’t working for the other ones either.

Always begin by opening your gas grill lid. This will help to allow gas from the tank to dissipate in the air. If gas builds up in the grill chamber before you go to light it, there is a risk of injury from a flare up.

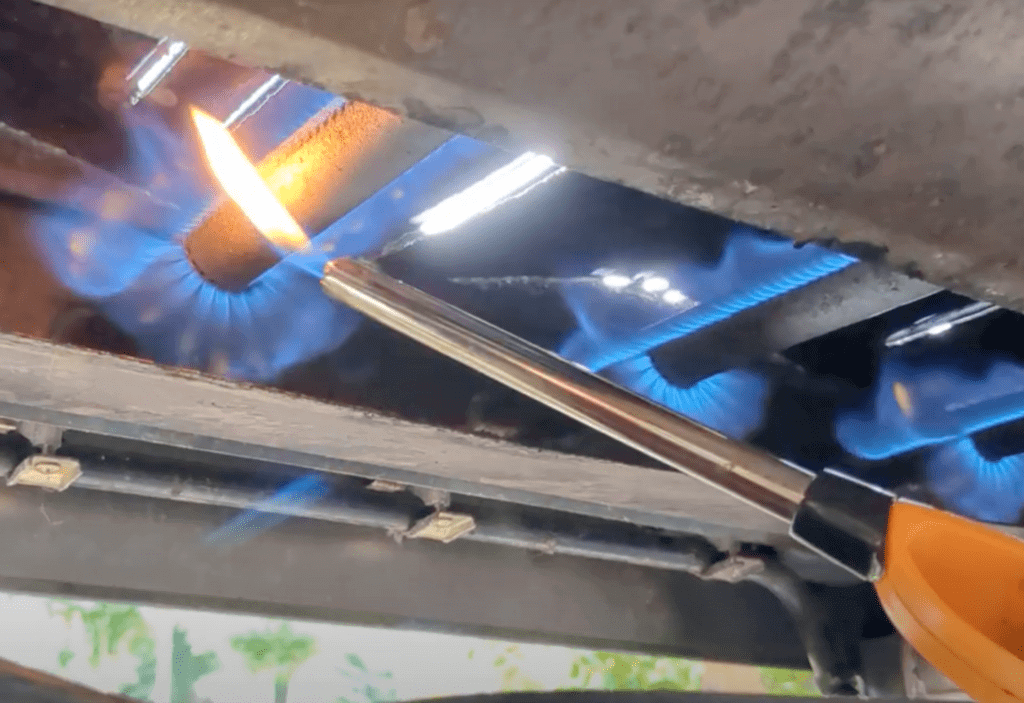
Turn the first burner on and put the tip of the lighter next to the burner keeping your hand. Additionally, keep the rest of your person and anything flammable away. Be careful as you use the lighter to let them, and be sure to turn on and light each burner one-at-a-time to avoid gas buildup in your grill.

3. If The Gas Grill Burner Doesn’t Light on Your First Try…

There might be something more than the gas igniter that’s off. It may be that your fuel tank is low or the hose or some connection in your setup is failing. Before you look for the issue and go to replace any of your grill parts, you may want to try again and see if you can get it to light.

If you try to light your grill again, just be sure to leave the grill lid open and let the chamber air out some before making another attempt with your long-stemmed candle lighter.

Safety Note to Grillers: Your safety is your responsibility. Never use a gas grill indoors. Always light your grill with the hood open. If you smell gas, or have trouble lighting your grill, turn off all gas sources and wait 15 minutes before trying again.

Watch Grill Parts Girl explain it instead on our youtube channel!

If you have more questions, leave us a comment! Or, take a minute to go visit our Youtube channel and learn more about your grill. We would love to connect with you there!

Happy Grilling!
-The Grill Parts Girl

Can You Grill A Turkey? – How to Grill a Delicious Turkey

Can You Grill a Turkey?

Happy Thanksgiving Week to all you Grillers out there. If the weather is cooling down, but you aren’t quite ready to put away your grill for the winter, you might be wondering if you can grill your turkey this week. In fact, grilled turkey the best turkey we’ve ever tasted. We know because Grill Girl had to try it out at the office one day.

You can easily grill a turkey on your gas grill with delicious results. Heat your grill to 325 degrees and use indirect heat, smoking chips, and the spatchcock method. Then get ready for a Thanksgiving meal worth celebrating. Check out details below or watch Grill Girl’s step by step videos!

Grill a Turkey, Step 1: Spatchcock the bird.

If you want to grill your turkey this year, Grill Girl highly recommends cutting out the back bone and flattening the bird down by breaking the rib bones. Then, cook the bird breast-side up. While the inside of the turkey gets cooked, the thighs and wings get done with a crispy skin. Most importantly, the breasts are cooked but not dry.

What’s in Grill Girl’s Roasting Pan?

Combine 1 Cup Apple Cider, 1 Bottle White Wine, 1 Quartered Onion, 2-3 Halved Carrots, 2-3 Halved Pieces of Celery, 3-4 Smashed Garlic Cloves, and 1-2 Teaspoons Ground Black Pepper.
A note from Grill Girl: “Feel free to use one bottle minus one cup of wine in the roasting pan, but drink it AFTER you cut out the backbone of the bird. You need to be sober for that part.”

“Salt The Bird” Tips

Grill Girl’s go-to rub for poultry is 2:1 Herbs de Provence and kosher salt (for a whole turkey, it’s about 1/2 cup herbs, 1/4 cup salt). Herbs de Provence is a blend of dried herbs and spices, that traditionally includes thyme, basil, rosemary, tarragon, savory, marjoram, oregano, and bay leaf. If those spices are a little much for you or you simply don’t have that blend, you can use any of those in combination with each other.

Spread the rub all over the skin. Then, work the rub under the skin where you can, including the thighs and the breasts. Lastly, sprinkle the remainder on the underside of the bird’s rib cage.

Grill a Turkey, Step 2: Prepare The Grill

Get smoke flavor into the turkey with smoking wood chips. You’ll need 4 cups of wood chips (whatever type you like best). Use one packet of dry chips and one packet of wet chips for maximum flavor. In other words, soak half the chips for about 15 minutes in water. After that, make 2 packets using aluminum foil with 2 cups of dry chips in one packet and 2 cups of wet chips in the other. Additionally, cut slits in the top of your packets. In the grill, place the packets directly over whichever burner is turned on. Rest the packets on the heat plates or briquettes. You can use a cast iron or stainless steel smoking tray instead.

Grill a Turkey, Step 3: Grill The Bird

First, remove your cooking grids. Heat your grill to 325 degrees. Then, turn off half your grill. Place the roasting pan over the burners that are turned off and the smoking chips over the burners that are turned on. The roasting pan and smoking chips will sit on the heat plates or briquettes you have covering your burners. Finally, replace your cooking grids and put the turkey over the roasting pan on the “off” side of your grill. As a result, the indirect heat and packets of chips create a smokey perfection.

Place an internal thermometer in the thickest part of the breast. For an accurate temperature, be sure the probe is not touching a bone. Cook your turkey to 165-170 degrees internally. For example, Grill Girl grilled this 12 lb bird for about 3 hours.

Grill a Turkey, Step 4: Remove, Slice, and Serve.

Currently, this is our favorite way of cooking the Thanksgiving bird here at GrillPartsSearch.com. With browned, crispy skin, and a beautiful pink smoke ring in the meat, our crew polished off this turkey in no time.

Likewise, running out of space in the kitchen? Throw your potatoes or other vegetables on the grill with your turkey for a complete, grilled Thanksgiving meal.

In short, Get Grilling and Happy Thanksgiving!

-Grill Girl


Dyna-Glo Drip Pan Grill Part Replacement

Grill Girl shows how to use a drip pan liner to replace the entire drip pan (or grease tray) in a Dyna-Glo DGF493BNP (also works in DGF493PNP).

Drip Pan Liner

**PLEASE NOTE: This is not an exact replacement. Grill Girl demonstrates how to use a less-expensive alternative as a replacement part for your drip pan/grease tray. Use with caution, be aware of over-heating and grease build-up. OEM replacements are available for sale at a higher price if you are looking for that instead. All replacements or upgrades made by you to your own grill are your responsibility.**

About the Dyna-Glo DGF493BNP & DGF493PNP

Hey Y’all, Grill Girl here. I have this brand new Dyna-Glo gas grill and I wanted to show you how to use one of our new drip pans liners on it. This is a four-burner gas grill. It has four heat plates and three cooking grids.This specific model is a DGF493BNP but there’s also a DGF493PNP. You can see in the video that sadly, it already has some signs of rust on the grill. This grill model has a lot of problems with rusting out of the grease pan or drip tray. So I wanted to show you today how you could easily replace that with one of our liners we just got available.

We’ve had so many calls about this Dyna-Glo drip pan. We strive to provide you with the parts you need to get back to grilling! Here’s what we learned.

The Dyna-Glo Original

These specific models are propane grills and you can access the original pan from the back of the grill. Easily lift and slide the pan out. The piece in the video is brand new and still looks like it’s in really good shape. There is also a little tray at the bottom that catches the grease. This design allows you to remove that and clean it out.

Even though the part is new, as I push down on the original pan with my thumb, it bends and flexes. This shows that the pan is not made of thick metal. Instead, it’s made of a pretty thin piece of sheet metal. The low quality of the pan is why they rust out so quickly. We have so many calls about this from customers like you.

Using a Drip Pan Liner

For this model, I replace the entire pan with a drip tray liner. I bent out the side a little bit to make it catch in the current slot for the original pan. It slides in and covers the entire bottom of the grill. It was really nice that these fit so well in the Dyna-Glo grills.

However, if you have an existing pan that is either smaller or larger than this, you can still use a liner. Get a the closest size of the drip pan liner to your original pan and place it in the bottom of your grill. Be sure to cover any holes in the original and you’ll be able to continue cooking with the current pan you have.

Cleaning the Drip Pan Liner

Because these liners do not have a hole where the grease drains, all the grease collects in the liner. It is very important to check the liner for grease build up. Take it out every couple of times you cook and clean it. Then, simply put it back in again.

Here to Help You

We’re hoping that this will provide a good solution at an affordable cost. As the drip pan liner gets old, corroded, or filled with grease, you can easily switch it out for a new one. That way you don’t have to throw out your whole grill just because of one part.

Please remember that we also sell exact-fit Dyna-Glo drip pans as well as drip pans and grease trays for many other models.

Let us know if this helped you! What other parts do you need to fix up your grill? Until Next Time, – Grill Girl

America’s Test Kitchen Rates Gas Grills Under $500

Hey Y’all! Grill Girl Here!

While I have my own favorite brand of gas grill (Modern Home Products or MHP), I know there are many out there to choose from! MHP also doesn’t currently have an option for a gas grill under $500.

America’s Test Kitchen is a company I love and trust for any recipe they provide because they thoroughly test recipes with different variations and cooking methods. When they came out with a video review of different gas grills under the $500 mark, I knew it would be worth watching.

I love the different ways they test the grills. Take note of the things they look at. Even if you don’t end up buying their recommendation, the way they test these grills and the points they make are really great! You should look at the heat dispersal, venting and general sturdiness of the grill. The BTU rating of a grill does not matter if all the heat will just go out too many vents!

What matters is a well made grill with a thick casting that can keep in heat and will cook your food evenly. Check out the video for even more details!

Hope this helps those of you looking for a new bbq this season!

-Grill Girl

Late Summer Grilling

Try a fresh piece of fish for your next grill meal!

Try a fresh piece of fish for your next grill meal!

Let’s admit – by the time we all get to August, we’re kind of done with the burgers and hot dogs. Even if you’re not totally sick of them, you should give it a break for just a few weeks because they will certainly become your staple again once football season starts back up.

For an alternative grilled dish, give a nice fresh fish a try! One of my favorites to throw on the grill is salmon. It has a pretty sturdy flesh which makes it much easier to maneuver on the grill.

The absolutely easiest way to cook fish on the grill is by putting it in an aluminum foil tray, smothering it with a garlic-herb butter and then just putting the tray directly onto the grill grids. You won’t get that pretty grill sear, but you are guaranteed that the fish won’t stick!

You can also use a cedar plank, just a sheet of aluminum, or put it directly on the cooking grid. Just make sure that if you do choose to put it on the grid, you oil it properly before placing the fish on it.  The safest way to oil a cooking grid is to put some oil on a paper towel and rub that thoroughly on the grid. Also, try to put your fish where the grid is the smoothest and the cleanest.

For even more tips, check out this video I made to answer a question from a customer!

That’s it for now! Do you have any tips on grilling fish? What’s your favorite thing to grill at the end of summer?

As Always- Happy Grilling!!
-Grill Girl

Gas Grill Hacks – Smoke


Many hard-core smoker fans out there will make the gas grillers feel inferior when they swap grilling stories.

Chins up all my gas grill friends! They can spend all their waking (and sleeping) hours over that hot smokey grill while you and I go on with our lives!

America’s Test Kitchen (one of my FAVORITE resources) has come out with a video detailing how to get that same smokey flavor on your gas grill.

Sure, you’re thinking – I know! – wood chips. But America’s Test Kitchen has put many different methods of using wood chips to the test and here’s what they came up with. Check out this short but sweet (or should I say smokey?) video that shows you how to get the PERFECT packet of chips!

You can thank me later!

Enjoy!!

-GG

Visit GrillPartsSearch.com’s profile on Pinterest.

Why Do I Have Flare-Ups?

Flare-ups in your grill are not always a sign something bad is happening.

Sometimes a bit of grease hits a flame and – poof – you see the flame because it was fueled for a moment and jumped up into your line of sight.

However, if you have a lot of flare-ups, or one spot that seems to flare a lot, that’s probably going to be a problem you can easily fix.

The first thing to check if your “heat dispersal.” What’s covering your burner? Is it protected properly from the drippings of your food? If there are large holes, your plate is falling apart, or missing entirely, that’s why you have the flare-ups!

Here’s a little video to show how easy it is to fix that problem:

Easily find your heat dispersal replacement now!

If you have brand new heat plates, heat tents, vapor bars, flavor bars (or whatever you call them!), and you still have flare-ups, give us a call. We’re always happy to help! 877-244-0737

-GG

GrillPartsSearch.com Red bar. Click Here to Return to GrillPartsSearch.com Home

How to Replace the Carry Over Tubes – with video


Hey Y’all, it’s the Grill Girl!

Today, we’re going to be replacing the carryover tubes on a Charbroil 463268606.

I’ve already removed all the grill parts except for the burners and carryover tubes. Unfortunately, you’ll see this carryover tube has already removed itself.

So, these are the carryover tubes, and as I already said, this one is missing. This piece has completely rusted out and it just fell right to the bottom of the grill.

The purpose of a carryover tube is to carry the lit gas from one burner to the next. so, when you turn this burner on and light it, then the lit gas will go into the next burner and light it.

It’s really just something to make it easier to grill – you don’t even have to have it to grill. You can light each burner separately.

However, we do sell the replacement for this grill.

You will need to use your own screws, but even if the screw is not completely tight, it will serve the purpose of holding the part in place.

You can see when I turn on this burner, it brings the flame right over – so, it works!

Thanks for watching!!

-GG

Visit GrillPartsSearch.com’s profile on Pinterest.

How to Find the Model Number on Your Gas Grill – w/ Video

Hey Y’all! Grill Girl Here to Help You Find Your Gas Grill Model Number!

Today we’re going to be finding the model number on a Charbroil 463268606.

You can use these tips to find the model number on most types of grills. And don’t worry – if you can’t find the model number or the number is illegible, we can still help you fix your grill.

On grills with front doors, the best place to check first is inside the doors. If the model number isn’t there, try going around the back of the grill.

You’ll be looking for a label or sticker that has tiny print. Usually the model number will be listed along with certification information and maybe even a serial number.

We’ve also written post about how different manufacturer’s format their model numbers so you know what to look for. You can find that post here: What’s a Model Number?

Thanks for watching!!

-GG

Thanks to RutgerMuller for our beats!

Replacing the Heat Shield – with Video

Hey Y’all! Grill Girl here!


Today we’re going to be replacing the heat shields on Charbroil 463268606 grill.

You will notice it’s time to replace the heat shields (or heat plates, vaporiser bars, flavorizer bars) when they are rusting excessively or have areas that have rusted through, leaving holes. In this case, we could bend the heat shield in half, it was so rusted.

This is a very simple job and usually all you have to do is lift out the old heat shield and set in the new heat shield.

Notice there used to be a peg in the casting of the grill that has rusted away to nothing. You can just rest the heat shield on the casting of the grill. It is still far enough away from the burner that no flames will touch it.

We used a stainless steel plate to replace the original porcelain coated plate. The stainless steel will long outlast the original.

Look at that pretty, shiny new stainless steel part!

Thanks for watching! -GG

Thanks to RutgerMuller for our beats